"Science is a way of investigating, understanding and explaining our natural world, physical world and wider universe" (NZ Curriculum).

Students need to lean what science is and how scientists work as well as scientific knowledge.

Science programmes at Eastern Hutt aim to provide hands on investigations that will develop students' curiosity of the world around us and an interest in science.

Friday, September 30, 2011

Seeing the world up close!

Our Year 1 students have been seeing the world up close through our magnificent microscopes.

I can see my hair.  It looks like string.

I can see the loops in my jacket.

I can see lots of different colours in my hair.

Does it Dissolve?

Sometimes when you mix things with water they seem to disappear.  But where have they gone?

For example - when you mix salt with water you can't see the salt anymore.  We say that the salt has dissolved.

When the water and the salt are mixed together the salt crystals get smaller and smaller.  They dissolve in the water to make a solution.  We can't see the salt but it is still there.

The Year 3 and 4 students did an investigation to find out which substances would dissolve in water.

The tea leaves did not dissolve.  They just floated around in the water.

The drink powder did dissolve.  We couldn't see the little crystals anymore.  They water changed to a green colour.

The sugar mostly dissolved.  Some of the crystals took a long time to dissolve.

Magnets Are Magnificent

Over the last 3 weeks our 5 year olds have been investigating magnets.  They learnt lots of things.
  • Magnets can only stick to metal.
  • Magnets can stick to other magnets.
  • Magnets can push other magnets away.
  • Magnets can work through things but only if they are strong enough or the object is thin.
Look at D1's amazing blog to see what they did with magnets.  D1 Dragons.


Friday, September 23, 2011

Silver Beet Smoothies!

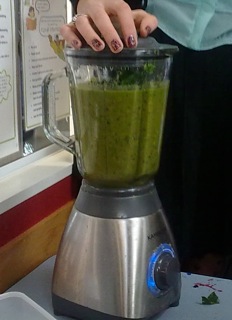
The unappetizing, sickly green gloop looked up at us. We decided to risk a sip... The silver beet smoothy was surprisingly delicious!

Each desk group in G4 had made their own smoothy recipe (but the main ingredient HAD to be silver beet), we all used the silver beet grown in our class garden and fruits from home. Our ingredients had been prepared earlier in the day

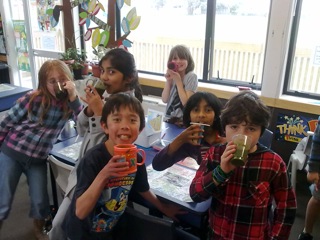
In our smoothy we included silver beet, kiwifruit, strawberries, bananas and a bit of water to blend it together. We watched in excitement as our smoothy got beaten together. We watched the solids liquify in the blender. When the smoothy was mixed we each poured some into our cups.

It was a wonderful experience that we all enjoyed! Many of us liked the smoothy so much we promised to try it at home!

By Jessica

To make a silver beet smoothy you will need:

Silver beet leaves
Fruits that you love e.g. bananas, mangos etc
A blender
A chopping board and knife
A cup
A good attitude


Friday, September 16, 2011

Hot and Cold Reactions

This activity is an old favourite and always works well so today I tried it again with a new group of Science Club kids.

Here are the instructions:


 The students observed what was happening and wrote the following notes:
  • There was a chemical reaction between the ingredients.
  • The plastic bag puffed up so a gas must of been produced.
  • The mixture fizzed and bubbled which also shows a gas must of been produced.
  • The first mixture went really cold.  This is an endothermic reaction.
  • The second mixture went really hot.  This is an exothermic reaction.
  • Reaction 1 - we mixed a base (baking soda) with and acid (tartaric acid) so the reaction produced carbon dioxide.
  • Reaction 2 - we mixed 2 bases so why did it fizz and bubble and produce gas???
  • The water helped to mix the 2 powders together.
  • Some of the bags popped when they filled with too much gas.
Carefully lowering in the water.
The mixture fizzes and puffs up the bag.
Watch out - It's going to explode!


Wednesday, September 7, 2011

Making a Fossil

Something strange is happening at EHS this week.  Time seems to be speeding up and fossils are forming in 1 hour instead of millions of years.

Well - not really.  We have been making models of fossils.  A mould fossil to be exact.


A mould fossil occurs when a bone, shell or footprint has left a print in the rock where it had been.  The bone or shell is no longer there because it has dissolved or rotted away.  All that remains is the space where it once was.

To make our own mould fossils this is what we did:
  1. Choose a shell and cover it with a thin layer of petroleum jelly.  This will stop it sticking.
  2. Choose a small container that the shell will fit into.  Smear a thin layer of petroleum jelly inside the container.  A plastic cup works really well.
  3. Next you have to work quickly.
  4. Mix up some plaster of paris with cold water until you get a gloopy plaster mix.
  5. Add a spoonful into the bottom of your cup and tap the cup on the table to get a smooth surface on the plaster.
  6. Now gently lower the shell on top of the plaster.  Don't push it down too far or it will be hard to remove later.
  7. Leave the fossil to set for at least 1 hour.  
  8. Now it is time to uncover the mould fossil.
  9. Carefully tap the plaster from the cup and take off the shell.
  10. You will be left with a mould in the shape of your shell.

Tuesday, September 6, 2011

The Three States of Water


The Year 3 and 4 students are learning about the States of Matter.  Matter is something that takes up space and can be a solid, liquid or gas.

We found out that water can be a solid, a liquid and a gas and can change from 1 to the other.

Look at this diagram above to help understand what happens.

  • When you cool down water this is called freezing and the water turns into ice (which is a solid).
  • If you heat up ice the solid melts into liquid water.  This is called melting.
  • If you heat up water it turns into steam or water vapour.  This is a gas and the process is called evaporation.
  • If you cool down steam or water vapour it changes back into liquid water.  This is called condensation.
We had to work really hard to learn these tricky scientific words.

We had to observe carefully when the water was heated up and saw the steam rising out of the pot.
Miss Harrison carefully held a plate above the steam and we could see that when the steam hit the cold plate it cooled down and changed back into liquid water.  The plate was all wet.

We had lots of fun when Miss Harrison challenged us to work out the fastest way to melt an ice cube without touching it.


I lay my ice cube on the warm ground so the heat from the ground would melt it. 


Thursday, September 1, 2011

Science Inspires Poetry

After learning about fossils a year 6 class wrote poetry inspired by the fossils they had seen. Here is an amazing poem written by Hazel.

The past, trapped in castings of stone.
Bars of rock block my way, jail of the underworld.
My body is being compressed ever so slowly down to the depths of the earth.
Memories of the past come rushing back as I am unearthed.
Preserved secrets finally unlocked stare with eyes full of wisdom back at me.